Monday, September 26, 2011

Buttermilk Caramel Syrup


I was looking for a recipe for buttermilk syrup for pancakes & found this recipe on the allrecipes.com website. It made the yummiest CARAMEL SAUCE ever! It wasn't really a breakfast syrup (way too sweet!), but it would be GREAT on ice cream. Anyhow, it was just yummy so I thought I'd post it on here so you can make it at home too.

Buttermilk Caramel Syrup:

3/4 cup Buttermilk (learn how to make your own butter & buttermilk on my homemade butter post)
1/2 cup Butter (or THRIVE Butter Powder reconstituted)
2 Tablespoons Corn Syrup
2 teaspoons Vanilla

I used homemade buttermilk for my recipe & it was SO SO SO good!


Mix your sugar, buttermilk, corn syrup, butter, & baking soda together in a TALL pan. Boil for 7 minutes & stir constantly. It boils up REALLY high & WILL boil over if you're not careful.


As your syrup is cooling add your vanilla. Stir well & you've got some yummy caramel syrup.


If you'd like to purchase any of the ingredients used in this recipe, comment below or visit my website: dani.shelfreliance.com

Thursday, September 15, 2011

Homemade Butter - Super EASY & Super YUMMY!


I just thought I would post this because
#1: It's FUN to do with the kids
&
#2: It tastes FABULOUS!!!

You can do this in a jar quite easily with some serious shaking, but sometimes it's just nice to put it in a mixer & let it go. I make homemade butter all the time now. It's SO easy.

All you need is some
HEAVY WHIPPING CREAM.
Yup, that's it.

Pour your whipping cream into your mixer & start mixing. Just let it go (it will take 10-20 minutes for it to turn into butter so be patient.) First you'll get a bowl of beautifully fluffed whipped cream. You'll want to eat it up with a spoon right then & there, but keep it going.


After it whips REALLY fluffy, it starts to get clumpy. Pretty soon it doesn't look so appetizing anymore. The clumps will start to turn yellowish in color. You're getting close when you hit this point.


Then out of nowhere, you'll hear a "CLUNK" & a bunch of "SWISH SWISH" noises. All of a sudden your butter will clump up into a ball & you'll have a LOT of "milk" at the bottom of your bowl. That is FRESH BUTTERMILK. Yum!


The best way to deal with fresh butter is to strain it.


Get all that delicious buttermilk left over into a container & save it in your fridge for some homemade ranch dressing or some buttermilk pancakes. It's the freshest buttermilk you can get! YOU MADE IT!


This sounds disgusting, but it's fun, especially for kids. You are going to need to knead that butter ball. Get every last drop of buttermilk out of it. It holds a TON so keep squeezing. If you can get that buttermilk out, it will last longer & won't spoil. In fact, I rinse my butter in the sink to make sure every last drop of milk is out of it.


Once it's all rinsed, add salt & knead it really well. Just taste it & keep adding salt until it tastes good to you. SIMPLE. Then it's ready to eat. Just put it in a container, bake some homemade bread, & you're set.

Tuesday, August 30, 2011

Chicken Chili Chowder


This is another family favorite in our house. I've had this recipe for so many years that I don't even remember where I got it. I've added things to it over the years & it is now the soup my kids request on cold days. And you want to know the best part? Now I don't have to run to the store if I'm out of veggies because I can just pull them from out of my food storage. Wahoo! I hope you enjoy it as much as we do. (You can substitute fresh or canned for any of these ingredients)

Chicken Chili Chowder:
1 pound Turkey Bacon, diced (or use 1 1/2 cups THRIVE Bacon TVP)
1 can of diced Green Chilies
1 Serrano Pepper, seeded & diced
1 teaspoon Cumin
3 cloves of Garlic, pressed
4 cups Chicken Broth (4 cups water + 4 teaspoons THRIVE Chicken Bouillon)
3 cups THRIVE Potato Chunks (or 5 fresh potatoes peeled & diced)
4 Chicken Breasts, diced & cooked (or 1 1/2 cups THRIVE Freeze Dried Chicken)
2 1/2 cups Milk (or 2 1/2 cups water + 1/3 cup THRIVE Instant Milk)
2/3 cup Green Onions, sliced

First thing you want to do is cook your chicken (if you're using fresh.) Sprinkle it with some salt & pepper & saute it in a frying pan with a little bit of oil. If using our wonderful Freeze Dried Chicken, just soak it in water for 10 minutes & drain. Season with salt & pepper & Voila! you're done! Set aside.


Next cook that bacon until it's nice & crispy in your soup pot. Then set it aside with your chicken. I love the Bacon TVP, but I'm just a total sucker for fresh turkey bacon. I can't get enough of it & if you've never tried it, GO OUT & BUY SOME! You'll never go back to the other stuff. It's better for you & has a LOT more flavor! If you're using the Bacon TVP, just set aside because it doesn't need to cook. EASY!


Now get your veggies ready! When using our veggies, there's no peeling or chopping at all! Simply measure & pour. (Cooking doesn't get much easier than this!) If you're using fresh, peel & cut up all your veggies for the soup.


A small warning about Serrano Peppers. You may want to wear gloves when seeding & chopping these puppies. They may be small, but they have a punch! I wasn't wearing gloves & I wound up wiping my poor little 2 year old boy's dirty mouth with my finger & he started screaming because it burned him. I never even thought about it. The rest of my kids got a kick out of licking my fingers to see who could keep a straight face the longest without getting a drink of water. They're hilarious. These add just the right spice to the soup.


Start off by stir frying your onions, carrots, chilies, peppers, garlic, & cumin in the leftover bacon grease. Cook for about 5 minutes or until your onions are translucent. Add your chicken broth & deglaze your pot.


Add your potatoes & salt, bring to a boil. Reduce the heat, cover, & simmer for 15 minutes.


Add your chicken & cook an additional 10 minutes. Combine flour & milk to make a smooth paste. Add it to the soup mixture & stir until thick (about 5 minutes.) Remove from heat. Stir in bacon & cheese until melted.

When you finish you want to see if a wooden spoon will stand straight up in your chowder. I like my chowders THICK & YUMMY. If your spoon stands up by itself, you know it's going to be DELICIOUS!


Serve hot with sliced green onions on top. Enjoy!


If you are interested in purchasing any of the ingredients used in this recipe, comment below or visit my website:

Wednesday, August 24, 2011

Cinnamon Sugar Graham Crackers


I have to admit. . . graham crackers bought at the store really aren't that bad for you. They don't contain a ginormous amount of processed foods, but I still thought it would be fun to make some of my own. Can I say FABULOUS? I'll continue making them because they taste almost like a cookie when you make them yourself. I loved it.

I used the recipe straight out of the THRIVE Cookbook. Normally I like to change things up & do it my way, but really this was the perfect recipe & why mess with perfection right?

Cinnamon Sugar Graham Crackers:

1/2 cup Butter, softened (or do 1/2 THRIVE Butter Powder + 1/4 cup Water)
1/2 cup THRIVE Brown Sugar, packed
1/3 cup Honey
1/2 cup THRIVE Powdered Milk, rehydrated (1 1/2 Tablespoons powder + 1/2 cup Water)
2 teaspoons Vanilla
1 Tablespoon Cinnamon
2 Tablespoons THRIVE White Sugar

Sift together the whole wheat flour, white flour, baking powder, & baking soda. Set aside.

In a medium bowl, cream the butter, brown sugar, & honey until light & fluffy.


Stir in the sifted ingredients alternating between the milk & vanilla..


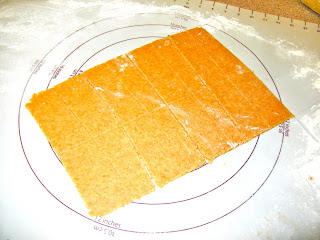
Cover dough & chill in the refrigerator for at least an hour. Preheat oven to 350 degrees. Divide the chilled dough into quarters. On a well floured surface, roll the dough out one quarter at a time into a large rectangle. (just like rolling out sugar cookie dough) The recipe says to roll it 1/8 inch thick, but I though the thicker grahams (1/4 in thick) turned out yummier. So it's up to you. Divide into smaller rectangles with a butter knife.


Place rectangles on ungreased baking sheets. Mark a line down the center of each one without cutting through the dough, & prick the tops with a fork. Combine cinnamon & white sugar & sprinkle over dough before baking.


Bake for 8-10 minutes until the edges are golden brown. Remove from baking sheets to cool on wire racks.


These are SO GOOD. I don't know why I expected them to be not as good as the store bought kind, but they're seriously like eating a cookie. FABULOUS. They're even better with ice cold milk. Mmmmm. The kids LOVED them too. In fact, my little two year old kept sneaking into the kitchen to eat more when I wasn't looking. He almost ate the entire batch the little stinker.


If you'd like to purchase any of the ingredients used in this recipe, comment below or visit my website:

Tuesday, August 23, 2011

Banana Nut Crumble Muffins


These are
THE BEST MUFFINS YOU WILL EVER EAT!
I made these the other day & we ate them ALL at one sitting. They were SO good, I had my sweet husband BEGGING for another batch.

Basically, I just started throwing things together & combining some old recipes I had & this was the end product. I hope you enjoy it as much as we did.

Banana Nut Crumble Muffins:

1/2 teaspoon THRIVE Iodized Salt
3 cups THRIVE Freeze Dried Bananas (or 3 brown bananas)
1 teaspoon Vanilla
1 Tablespoon THRIVE Egg Powder (+ 2 Tablespoons Water in wet ingredients)
1/3 cup THRIVE Butter Powder (+ 1/4 cup Water in wet ingredients)
1/2 cups Chopped Walnuts (optional)

2 Tablespoons THRIVE White Flour
1 Tablespoon THRIVE Butter Powder (mixed with 1/2 Tablespoon Water)

Preheat your oven to 375 degrees. Grease 12 muffin cups (or use liners). Let your Freeze Dried bananas soak in 4 cups of water for 10 minutes until they are soft & ready to be squished. Then drain out the extra water.


While your bananas are soaking, mix your dry ingredients: flour, baking powder, baking soda, & salt.


Add your powdered egg & powdered butter to the dry ingredients. I know it sounds SO strange, but you have to trust me. It works out & bakes just fine. It's hard to get used to, but it makes your food DELICIOUS.


In another bowl beat the bananas, vanilla, sugars, & 1/4 + 2 Tablespoons water (to make up for your powdered egg & powdered butter. . . again, trust me on this.)


Add the wet ingredients to the dry ingredients & mix thoroughly. Add your nuts & stir until evenly distributed. Scoop into the muffin cups until 2/3 full (or even a little more).

In a small bowl mix the brown sugar, flour, & prepared butter powder until you have a nice little crumble. (I had to make two batches of this because I ate most of the first one.)


Sprinkle the cupcakes GENEROUSLY with the crumble. Put a TON on them. It's SO good.


Bake muffins for 18-20 minutes until baked all the way through. We ate them HOT out of the oven & all 12 were gone in minutes.


I hope you enjoy them as much as my family did.


If you are interested in purchasing any of the ingredients listed in this recipe, comment below or visit my website:

Thursday, August 11, 2011

Sloppy Joe Pizza


This is another family favorite at our house. This is one I just put together myself one day using whatever I had in the pantry. It's funny how it's THOSE recipes that become our favorites. Plus, it's even EASIER when you use THRIVE food.

Since it wasn't a real recipe my kids named it Sloppy Joe Pizza because it looks like sloppy joe meat on a pizza crust. This is one of those recipes that you could add & subtract all sorts of fun ingredients (like veggies) to make it to your liking. This is the way the Potter's like it:

Sloppy Joe Pizza

2 cups THRIVE Freeze Dried Ground Beef (you can also use the THRIVE Beef TVP)
1 bottle of your favorite BBQ Sauce
3/4 cup green onions, sliced
1 cup shredded cheese or THRIVE Freeze Dried Cheddar Cheese
1 loaf of Bread. . . we like the Italian Loaves

Rehydrate the corn & beef in 4 cups of water for 10 minutes. Drain. In a pan stir the Ground Beef, Corn, BBQ Sauce, Onions, & Salt. Heat through.


Slice your bread & place the bread slices on a baking sheet.


Top each slice of bread with the meat mixture until it's heaping with yumminess.


Sprinkle with cheddar cheese (just like a pizza). Normally I use the Freeze Dried Cheddar Cheese, but my little chick-a-dees ate my ENTIRE #10 CAN without me knowing. Little imps. (I guess that tells you how GOOD the cheese is). So I used just everyday shredded cheese.


Bake at 425 for 12-15 minutes until the cheese is golden. You're kids will LOVE this. And don't forget to sneak in some veggies. I've done spinach, peppers, broccoli, & others. I make it differently every time, but THIS recipe is the family favorite.


If you would like to purchase any of these ingredients leave a comment below or visit my website: